This article was originally published on mesameergaikwad as CRUD Operations In ASP.NET MVC Using ADO.NET #mesameergaikwad.
CRUD Operations In ASP.NET MVC Using ADO.NET
In this post, I’m going to discuss the CRUD (Create, Read, Update, and Delete) Operations in an ASP.NET MVC application by using raw ADO.NET. Most of the new learners, who started to learn MVC asked this frequently. That’s the main reason I wrote this tutorial. In this article, I’m going to explain the step-by-step procedure from DB table creation to all MVC files.
check out the GitHub project link
Software Requirements
For this particular application, I have used the following configuration:
- Visual Studio 2015
- SQL Server 2008
In order to keep my hand clean, I have used a simple table to do the CRUD operation.
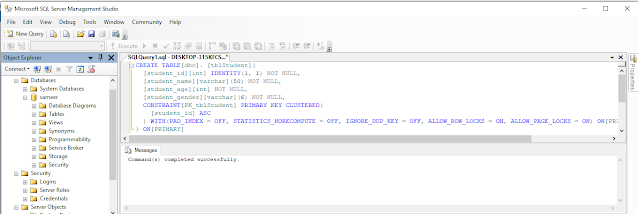
Step 1: Execute the following script on your DB.
- SET ANSI_NULLS ON
- GO
- SET QUOTED_IDENTIFIER ON
- GO
- SET ANSI_PADDING ON
- GO
- CREATE TABLE[dbo]. [tblStudent](
- [student_id][int] IDENTITY(1, 1) NOT NULL,
- [student_name][varchar](50) NOT NULL,
- [stduent_age][int] NOT NULL,
- [student_gender][varchar](6) NOT NULL,
- CONSTRAINT[PK_tblStudent] PRIMARY KEY CLUSTERED(
- [student_id] ASC
- ) WITH(PAD_INDEX = OFF, STATISTICS_NORECOMPUTE = OFF, IGNORE_DUP_KEY = OFF, ALLOW_ROW_LOCKS = ON, ALLOW_PAGE_LOCKS = ON) ON[PRIMARY]
- ) ON[PRIMARY]
- GO
- SET ANSI_PADDING OFF
- GO
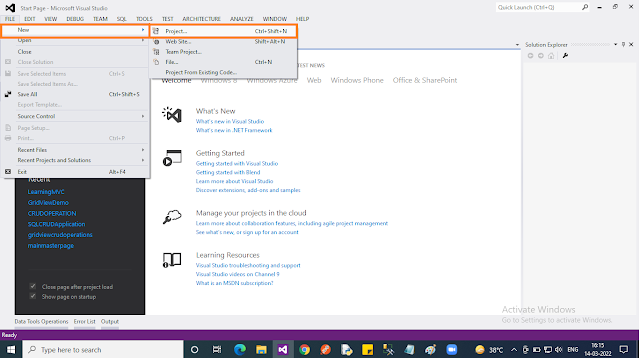
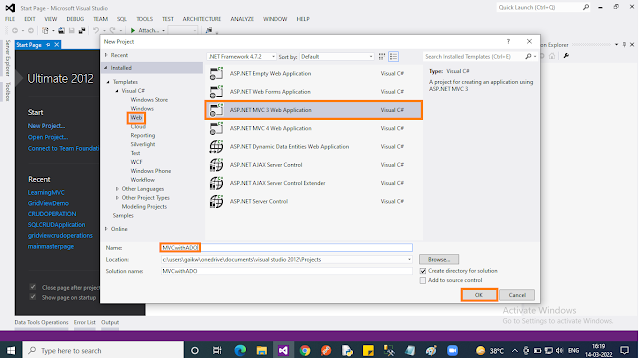
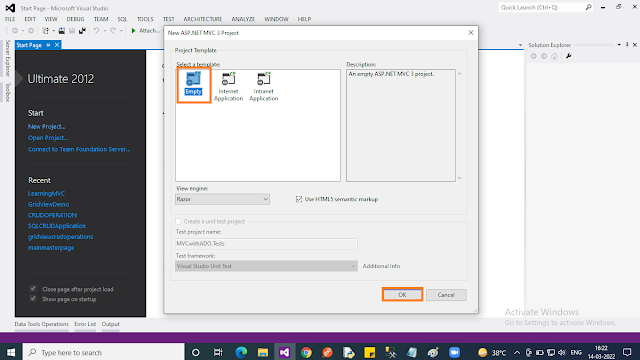
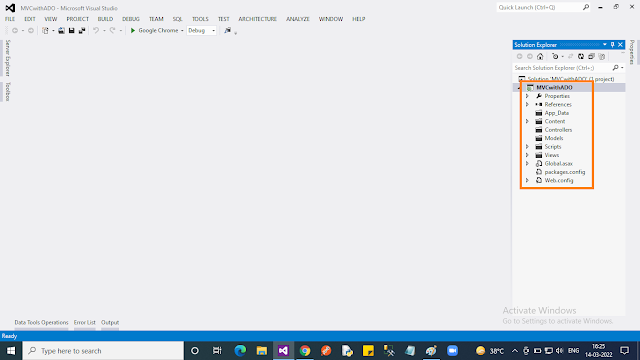
Step 2: Create an “Empty” ASP.NET MVC application in Visual Studio 2015.
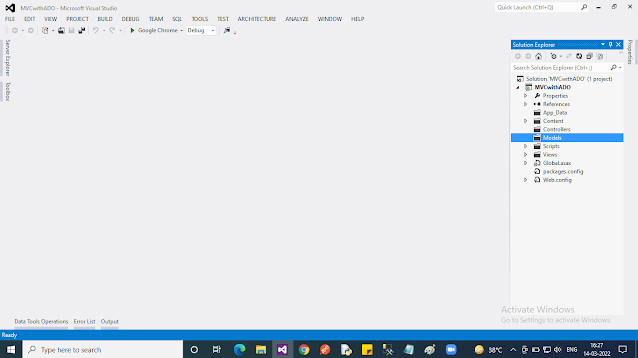
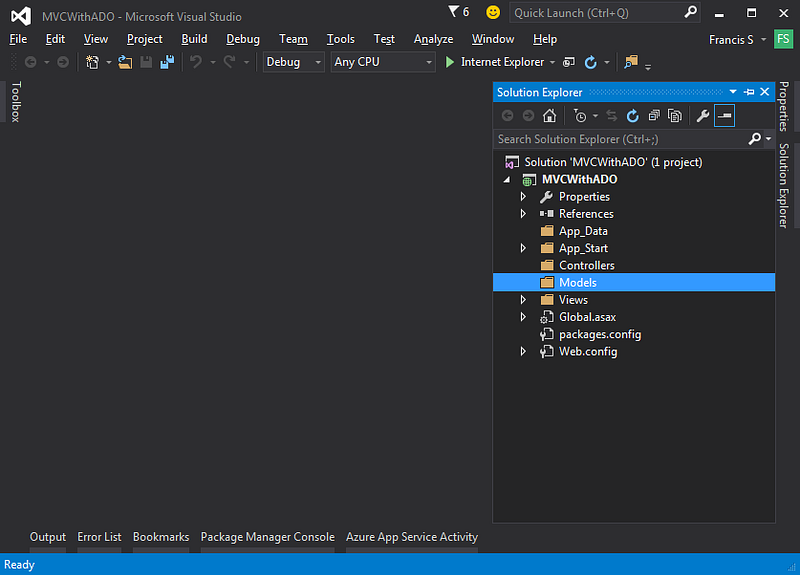
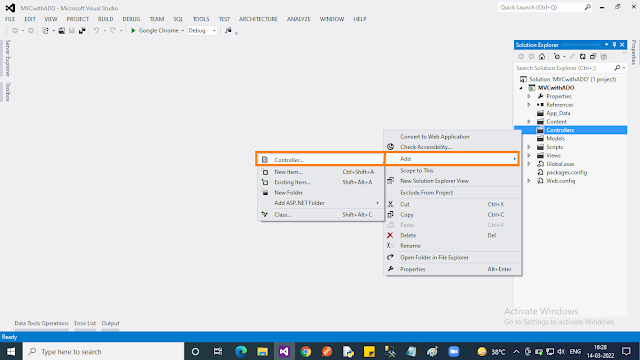
Step 3:
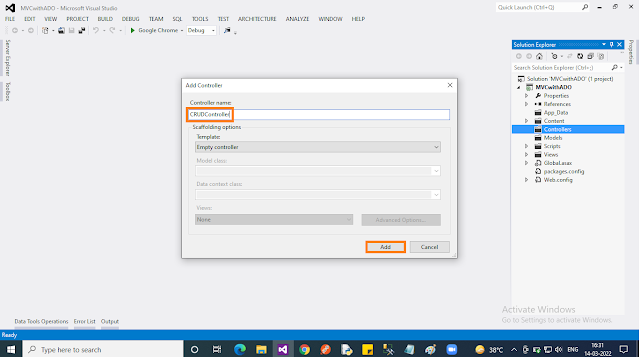
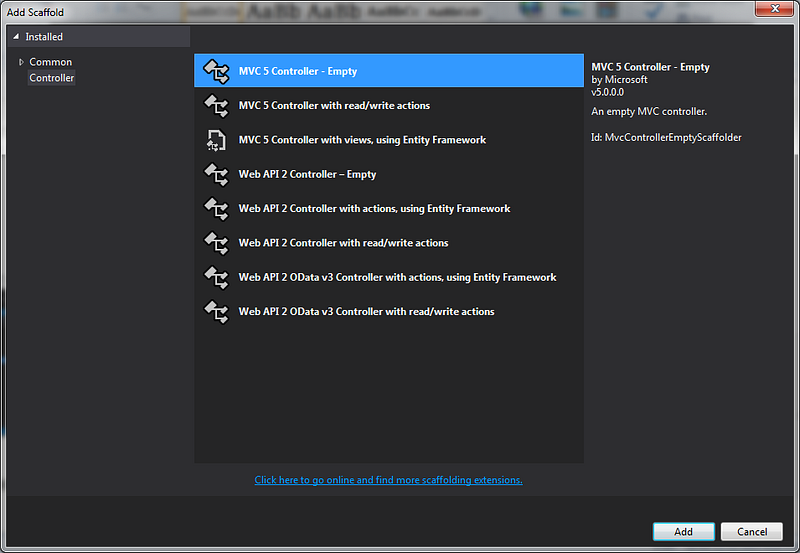
Add an “Empty” Controller by right-clicking on the “Controller” folder. Select “Add” then select “Controller..”. In the popup select “MVC 5 Controller”, then click “Add”. In the next popup, you should give the name “CRUDController”.
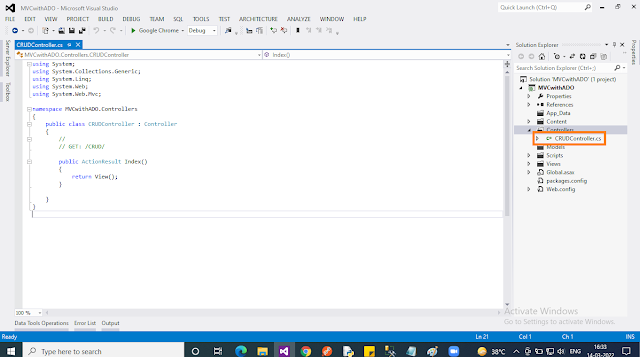
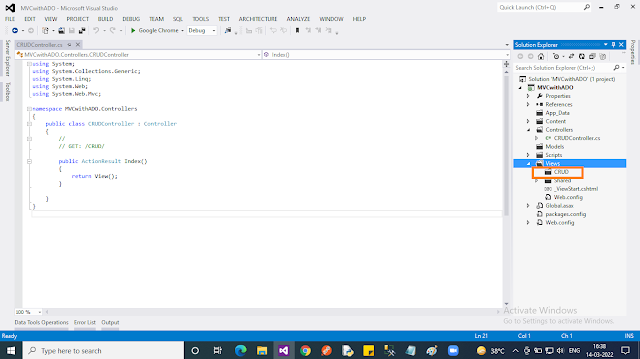
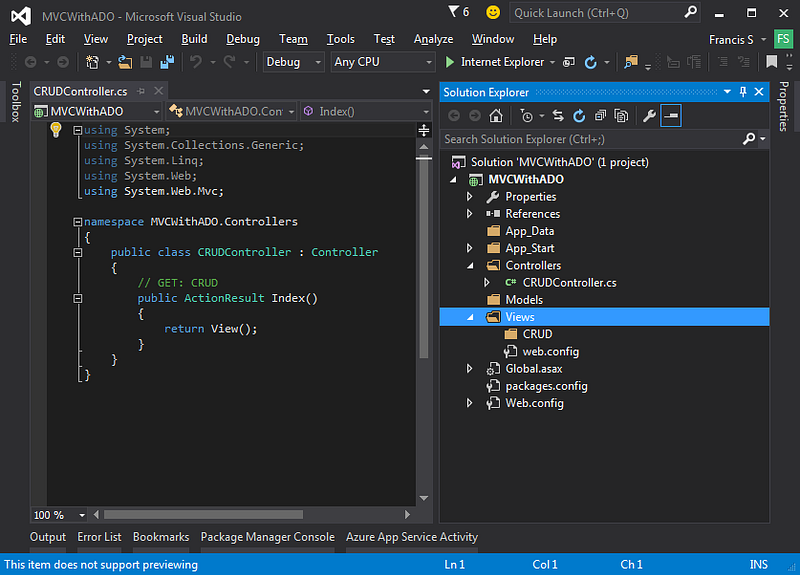
After adding the controller, you may notice as per the “convention” in ASP.NET MVC under the “Views” folder, a new folder named “CRUD” was also created.
Step 4:
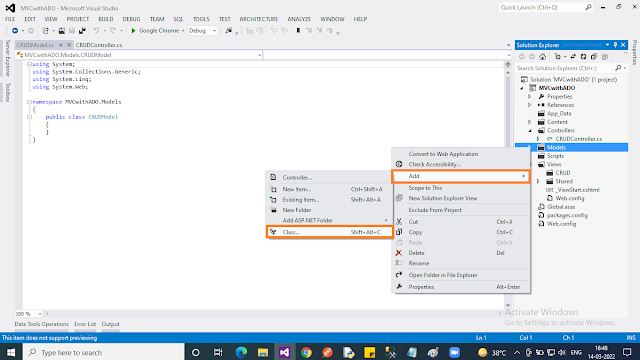
Our DB access code is going to be placed inside the “Models” folder. The model is just a “Class” file. So we are going to create a Model class for our purpose as below:
- Right-click on the “Model” folder. In the context menu select “Add” then choose “New item..”.
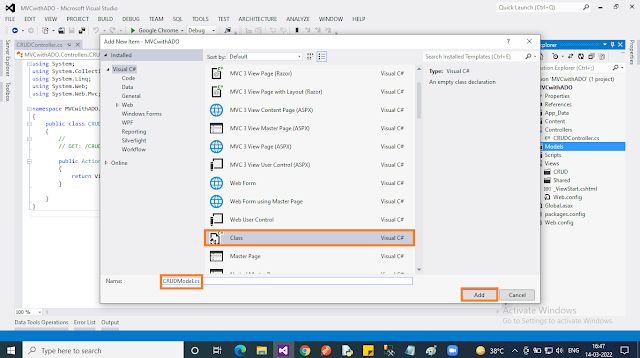
- In the popup, select “Code” then choose “Class” name the class file as “CRUDModel” then click “Add”. That’s all!

Step 5:
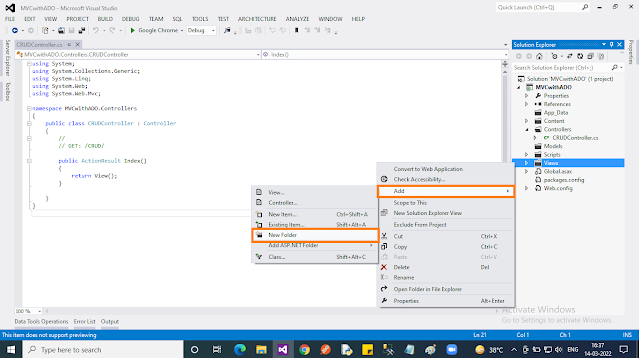
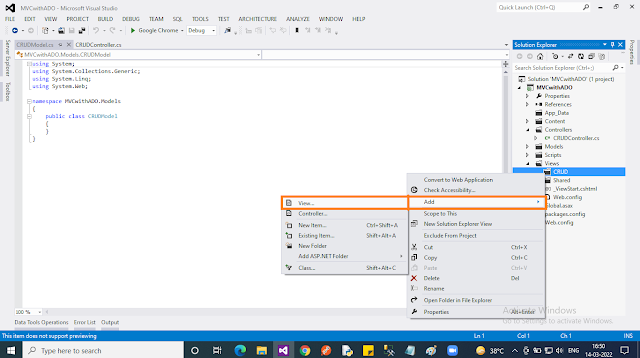
Till now we created classes for “Controller” and “Model”. We didn’t create any views till now. In this step, we are going to create a view, which is going to act as a “home” page for our application. In order to create the view:
- Right-click on the “CRUD” folder under the “Views” folder in the context menu select “Add” then choose “View..”.
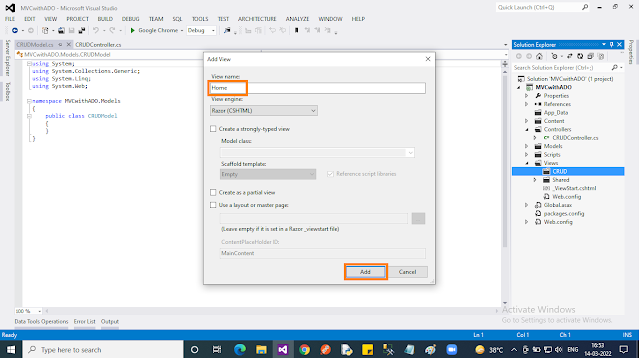
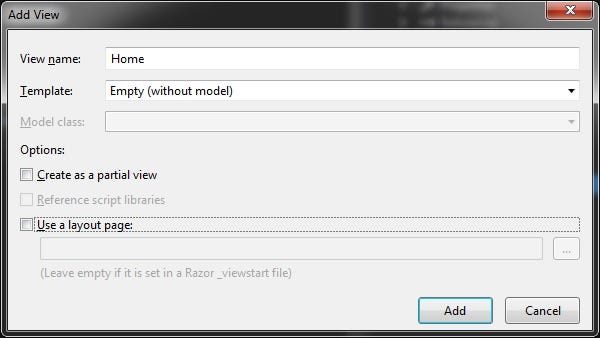
- In the popup, give “View name” and uncheck the “Use a layout page” checkbox. Finally, click the “Add” button.
Step 6:
We don’t have a controller named “Default”, which is specified in the “RouteConfig.cs” file. We need to change the controller’s name to “CRUD”, in the default route values.
Route.config
- using System;
- using System.Collections.Generic;
- using System.Linq;
- using System.Web;
- using System.Web.Mvc;
- using System.Web.Routing;
- namespace MVCWithADO {
- public class RouteConfig {
- public static void RegisterRoutes(RouteCollection routes) {
- routes.IgnoreRoute(“{resource}.axd/{*pathInfo}”);
- routes.MapRoute(
- name: “Default”,
- url: “{controller}/{action}/{id}”,
- defaults: new { controller = “CRUD”, action = “Index”, id = UrlParameter.Optional }
- );
- }
- }
- }
After the above change, just press F5 in Visual Studio, to verify that our application works fine without any error.
Step 7:
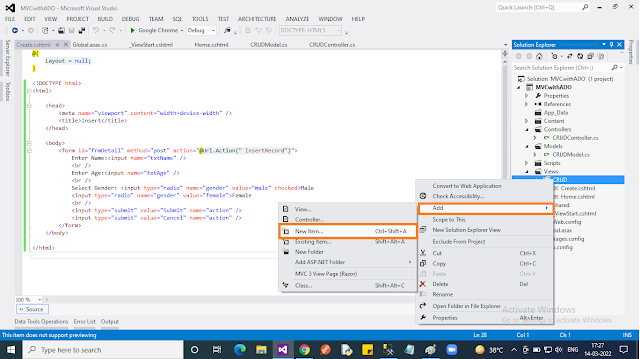
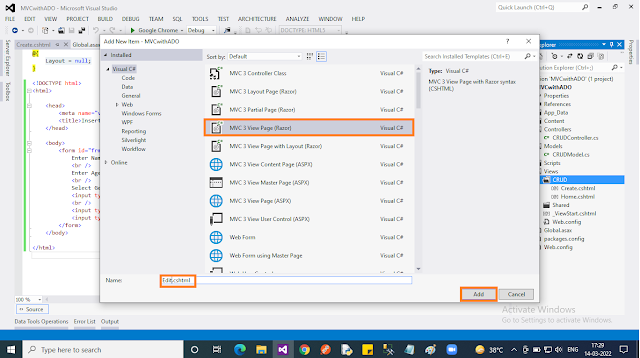
In order to achieve the complete CRUD operation, I’m going to add a number of views as described in Step 5. Here is the complete list of views and their purpose.
ViewPurposeHome.cshtmlThis is the default view. Loaded when the application launched. Will display all the records in the tableCreate.cshtmlDisplays control’s to insert the record. Will be rendered when the “Add New Record” button is clicked on the “Home.cshtml” view.Edit.cshtmlDisplays control’s to edit the record. Will be rendered when the “Edit” button is clicked on the “Home.cshtml” view.
Step 8:
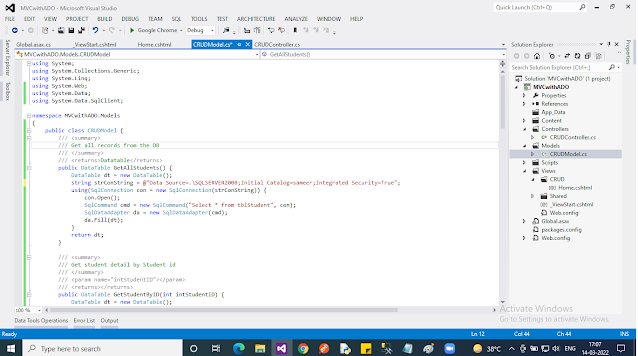
The model class contains all the “Data Access” logic. In other words, it will interact with the Database and give it back to “View” through “Controller”.
CRUDModel.cs
- using System.Data;
- using System.Data.SqlClient;
- namespace MVCWithADO.Models {
- public class CRUDModel {
- /// <summary>
- /// Get all records from the DB
- /// </summary>
- /// <returns>Datatable</returns>
- public DataTable GetAllStudents() {
- DataTable dt = new DataTable();
- string strConString = @ “Data Source=WELCOME-PC\SQLSERVER2008;Initial Catalog=MyDB;Integrated Security=True”;
- using(SqlConnection con = new SqlConnection(strConString)) {
- con.Open();
- SqlCommand cmd = new SqlCommand(“Select * from tblStudent”, con);
- SqlDataAdapter da = new SqlDataAdapter(cmd);
- da.Fill(dt);
- }
- return dt;
- }
- /// <summary>
- /// Get student detail by Student id
- /// </summary>
- /// <param name=”intStudentID”></param>
- /// <returns></returns>
- public DataTable GetStudentByID(int intStudentID) {
- DataTable dt = new DataTable();
- string strConString = @ “Data Source=WELCOME-PC\SQLSERVER2008;Initial Catalog=MyDB;Integrated Security=True”;
- using(SqlConnection con = new SqlConnection(strConString)) {
- con.Open();
- SqlCommand cmd = new SqlCommand(“Select * from tblStudent where student_id=” + intStudentID, con);
- SqlDataAdapter da = new SqlDataAdapter(cmd);
- da.Fill(dt);
- }
- return dt;
- }
- /// <summary>
- /// Update the student details
- /// </summary>
- /// <param name=”intStudentID”></param>
- /// <param name=”strStudentName”></param>
- /// <param name=”strGender”></param>
- /// <param name=”intAge”></param>
- /// <returns></returns>
- public int UpdateStudent(int intStudentID, string strStudentName, string strGender, int intAge) {
- string strConString = @ “Data Source=WELCOME-PC\SQLSERVER2008;Initial Catalog=MyDB;Integrated Security=True”;
- using(SqlConnection con = new SqlConnection(strConString)) {
- con.Open();
- string query = “Update tblStudent SET student_name=@studname, student_age=@studage , student_gender=@gender where student_id=@studid”;
- SqlCommand cmd = new SqlCommand(query, con);
- cmd.Parameters.AddWithValue(“@studname”, strStudentName);
- cmd.Parameters.AddWithValue(“@studage”, intAge);
- cmd.Parameters.AddWithValue(“@gender”, strGender);
- cmd.Parameters.AddWithValue(“@studid”, intStudentID);
- return cmd.ExecuteNonQuery();
- }
- }
- /// <summary>
- /// Insert Student record into DB
- /// </summary>
- /// <param name=”strStudentName”></param>
- /// <param name=”strGender”></param>
- /// <param name=”intAge”></param>
- /// <returns></returns>
- public int InsertStudent(string strStudentName, string strGender, int intAge) {
- string strConString = @ “Data Source=WELCOME-PC\SQLSERVER2008;Initial Catalog=MyDB;Integrated Security=True”;
- using(SqlConnection con = new SqlConnection(strConString)) {
- con.Open();
- string query = “Insert into tblStudent (student_name, student_age,student_gender) values(@studname, @studage , @gender)”;
- SqlCommand cmd = new SqlCommand(query, con);
- cmd.Parameters.AddWithValue(“@studname”, strStudentName);
- cmd.Parameters.AddWithValue(“@studage”, intAge);
- cmd.Parameters.AddWithValue(“@gender”, strGender);
- return cmd.ExecuteNonQuery();
- }
- }
- /// <summary>
- /// Delete student based on ID
- /// </summary>
- /// <param name=”intStudentID”></param>
- /// <returns></returns>
- public int DeleteStudent(int intStudentID) {
- string strConString = @ “Data Source=WELCOME-PC\SQLSERVER2008;Initial Catalog=MyDB;Integrated Security=True”;
- using(SqlConnection con = new SqlConnection(strConString)) {
- con.Open();
- string query = “Delete from tblStudent where student_id=@studid”;
- SqlCommand cmd = new SqlCommand(query, con);
- cmd.Parameters.AddWithValue(“@studid”, intStudentID);
- return cmd.ExecuteNonQuery();
- }
- }
- }
- }
CRUDController.cs
In an MVC application, controller is the entry point. The following code contains all the action methods for the complete CRUD operation.
- using System;
- using System.Collections.Generic;
- using System.Linq;
- using System.Web;
- using System.Web.Mvc;
- using System.Data;
- using System.Data.SqlClient;
- using MVCWithADO.Models;
- namespace MVCWithADO.Controllers {
- public class CRUDController: Controller {
- /// <summary>
- /// First Action method called when page loads
- /// Fetch all the rows from DB and display it
- /// </summary>
- /// <returns>Home View</returns>
- public ActionResult Index() {
- CRUDModel model = new CRUDModel();
- DataTable dt = model.GetAllStudents();
- return View(“Home”, dt);
- }
- /// <summary>
- /// Action method, called when the “Add New Record” link clicked
- /// </summary>
- /// <returns>Create View</returns>
- public ActionResult Insert() {
- return View(“Create”);
- }
- /// <summary>
- /// Action method, called when the user hit “Submit” button
- /// </summary>
- /// <param name=”frm”>Form Collection Object</param>
- /// <param name=”action”>Used to differentiate between “submit” and “cancel”</param>
- /// <returns></returns>
- public ActionResult InsertRecord(FormCollection frm, string action) {
- if (action == “Submit”) {
- CRUDModel model = new CRUDModel();
- string name = frm[“txtName”];
- int age = Convert.ToInt32(frm[“txtAge”]);
- string gender = frm[“gender”];
- int status = model.InsertStudent(name, gender, age);
- return RedirectToAction(“Index”);
- } else {
- return RedirectToAction(“Index”);
- }
- }
- /// <summary>
- /// Action method called when the user click “Edit” Link
- /// </summary>
- /// <param name=”StudentID”>Student ID</param>
- /// <returns>Edit View</returns>
- public ActionResult Edit(int StudentID) {
- CRUDModel model = new CRUDModel();
- DataTable dt = model.GetStudentByID(StudentID);
- return View(“Edit”, dt);
- }
- /// <summary>
- /// Actin method, called when users update the record or cancel the update.
- /// </summary>
- /// <param name=”frm”>Form Collection</param>
- /// <param name=”action”>Denotes the action</param>
- /// <returns>Home view</returns>
- public ActionResult UpdateRecord(FormCollection frm, string action) {
- if (action == “Submit”) {
- CRUDModel model = new CRUDModel();
- string name = frm[“txtName”];
- int age = Convert.ToInt32(frm[“txtAge”]);
- string gender = frm[“gender”];
- int id = Convert.ToInt32(frm[“hdnID”]);
- int status = model.UpdateStudent(id, name, gender, age);
- return RedirectToAction(“Index”);
- } else {
- return RedirectToAction(“Index”);
- }
- }
- /// <summary>
- /// Action method called when the “Delete” link clicked
- /// </summary>
- /// <param name=”StudentID”>Stutend ID to edit</param>
- /// <returns>Home view</returns>
- public ActionResult Delete(int StudentID) {
- CRUDModel model = new CRUDModel();
- model.DeleteStudent(StudentID);
- return RedirectToAction(“Index”);
- }
- }
- }
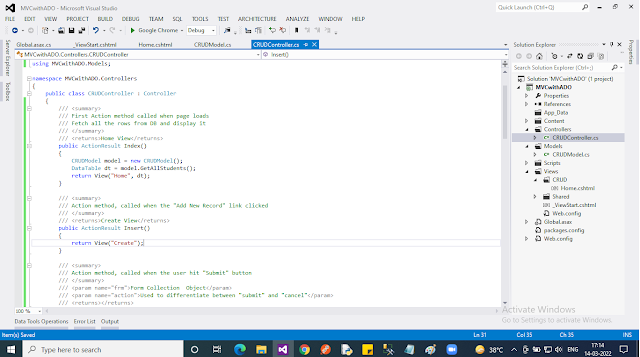
Views
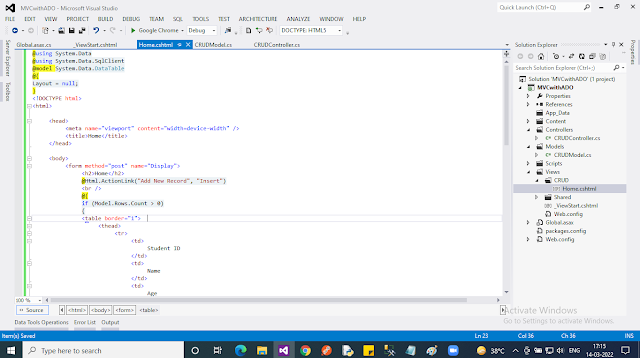
Views are a combination of markup as well as server-side code. As you noticed the views “Home” and “Edit” take the ADO.NET object Datatable as a model. Also, for simplicity, I don’t use “Layout”.
Home.cshtml
- @using System.Data
- @using System.Data.SqlClient
- @model System.Data.DataTable
- @{
- Layout = null;
- }
- <!DOCTYPE html>
- <html>
- <head>
- <meta name=”viewport” content=”width=device-width” />
- <title>Home</title>
- </head>
- <body>
- <form method=”post” name=”Display”>
- <h2>Home</h2>
- @Html.ActionLink(“Add New Record”, “Insert”)
- <br />
- @{
- if (Model.Rows.Count > 0)
- {
- <table border=”1">
- <thead>
- <tr>
- <td>
- Student ID
- </td>
- <td>
- Name
- </td>
- <td>
- Age
- </td>
- <td>Gender</td>
- </tr>
- </thead>
- @foreach (DataRow dr in Model.Rows)
- {
- <tr>
- <td>@dr[“student_id”].ToString() </td>
- <td>@dr[“student_name”].ToString() </td>
- <td>@dr[“student_age”].ToString() </td>
- <td>@dr[“student_gender”].ToString() </td>
- <td>@Html.ActionLink(“Edit “, “Edit”, new { StudentID = dr[“student_id”].ToString() })</td>
- <td>@Html.ActionLink(“| Delete”, “Delete”, new { StudentID = dr[“student_id”].ToString() })</td>
- </tr>
- }
- </table>
- <br />
- }
- else
- {
- <span> No records found!!</span>
- }
- }
- </form>
- </body>
- </html>
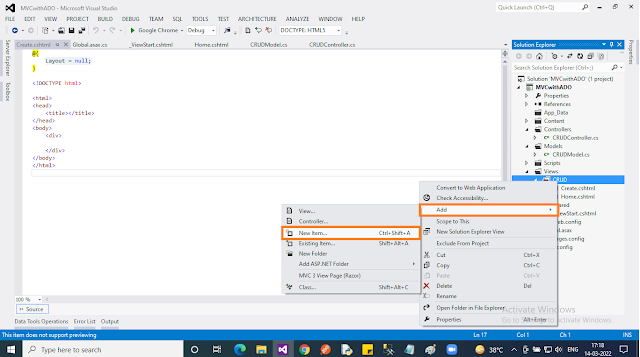
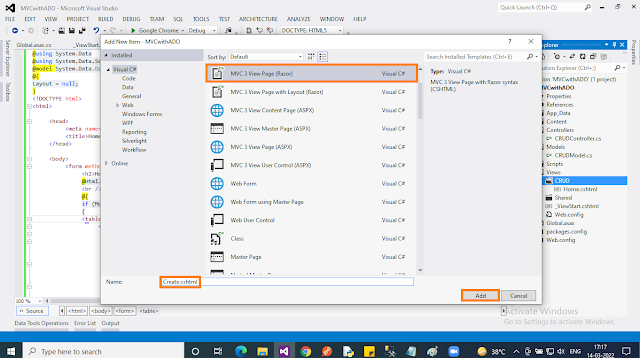
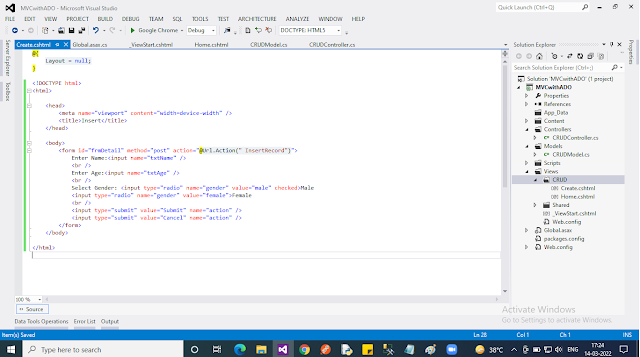
Create.cshtml
- <!DOCTYPE html>
- <html>
- <head>
- <meta name=”viewport” content=”width=device-width” />
- <title>Insert</title>
- </head>
- <body>
- <form id=”frmDetail” method=”post” action=”@Url.Action(“ InsertRecord”)”>
- Enter Name:<input name=”txtName” />
- <br />
- Enter Age:<input name=”txtAge” />
- <br />
- Select Gender: <input type=”radio” name=”gender” value=”male” checked>Male
- <input type=”radio” name=”gender” value=”female”>Female
- <br />
- <input type=”submit” value=”Submit” name=”action” />
- <input type=”submit” value=”Cancel” name=”action” />
- </form>
- </body>
- </html>
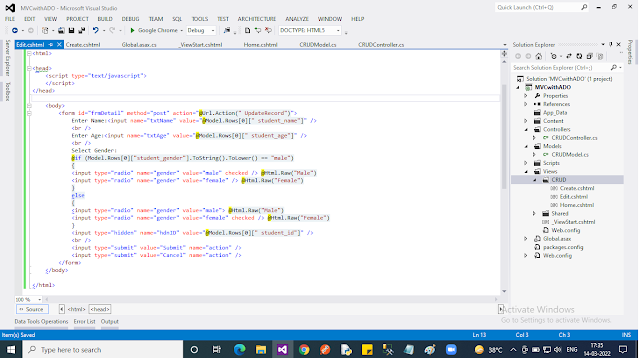
Edit.cshtml
- @using System.Data
- @using System.Data.SqlClient
- @model System.Data.DataTable
- @{
- ViewBag.Title = “EditView”;
- }
- <html>
- <head>
- <script type=”text/javascript”>
- </script>
- </head>
- <body>
- <form id=”frmDetail” method=”post” action=”@Url.Action(“ UpdateRecord”)”>
- Enter Name:<input name=”txtName” value=”@Model.Rows[0][“ student_name”]” />
- <br />
- Enter Age:<input name=”txtAge” value=”@Model.Rows[0][“ student_age”]” />
- <br />
- Select Gender:
- @if (Model.Rows[0][“student_gender”].ToString().ToLower() == “male”)
- {
- <input type=”radio” name=”gender” value=”male” checked /> @Html.Raw(“Male”)
- <input type=”radio” name=”gender” value=”female” /> @Html.Raw(“Female”)
- }
- else
- {
- <input type=”radio” name=”gender” value=”male”> @Html.Raw(“Male”)
- <input type=”radio” name=”gender” value=”female” checked /> @Html.Raw(“Female”)
- }
- <input type=”hidden” name=”hdnID” value=”@Model.Rows[0][“ student_id”]” />
- <br />
- <input type=”submit” value=”Submit” name=”action” />
- <input type=”submit” value=”Cancel” name=”action” />
- </form>
- </body>
- </html>
Readers, I hope you like this article. Let me know your thoughts as comments.


0 Comments