

Sometimes there is a need to insert, update and delete records in a GridView using a single Stored Procedure instead of creating separate Stored Procedures for each operation.
Suppose I have one .aspx web page in which I need to insert, view, update and delete records. To do that, instead of creating four Stored Procedures to perform these tasks I will create a single Stored Procedure to satisfy my requirements and I will access it in code behind depending on the action performed by the end-user on a button click.
I have written this article, especially focusing on newcomers and anyone new who wants to insert, update and delete records in a GridView using a Single Stored Procedure, so let us start with a basic introduction.
First create the table named employee as:

I have set the primary key on the id column and I have set the Identity specification to Yes.
Now we have a table to perform these operations for. Now let us start to create the Stored Procedure.
The Stored Procedure is created using the keyword "Create Procedure" followed by the procedure name. Let us create the Stored Procedure named "EmpEntry" as in the following:
- create Procedure EmpEntry
- (
- @Action Varchar (10),
- @id int=null,
- @FnameVarchar (50)=null,
- @MName Varchar (50)=null,
- @Lname Varchar (50)=null
- )
- as
- Begin
- SET NOCOUNT ON;
- If @Action='Insert'
- Begin
- Insert Into employee (FName,MName,LName)values(@Fname,@MName,@Lname)
- End
- else if @Action='Select'
- Begin
- select *from employee
- end
- else if @Action='Update'
- Begin
- update employeeset FName=@Fname,MName=@MName,LName=@Lname where id=@id
- End
- Else If @Action='delete'
- Begin
- delete from employeewhere id=@id
- end
- End

Now create the one sample application "Empsys" as:
"Start" -> "All Programs" -> "Microsoft Visual Studio 2012".
"File" -> "New Project" ->


Provide the website a name such as "CRUDOPERATION" or another as you wish and specify the location.
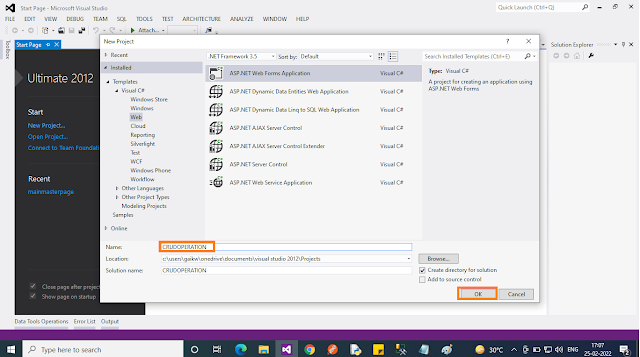
Then right-click on Solution Explorer - "Add New Item" - "Default.aspx page".


Drag and drop one button, three textboxes, one GridView, and one hidden field to the hidden value to the database and one label on the <form> section of the Default.aspx page.
Then switch to the design view; the <form> section of the Default aspx page source will look as in the following:
- <form id="form1"runat="server">
- <div>
- First Name <asp:TextBox ID="TextBox1" runat="server"></asp:TextBox>
- Middle Name<asp:TextBox ID="TextBox2" runat="server"></asp:TextBox>
- Last Name <asp:TextBox ID="TextBox3" runat="server"></asp:TextBox>
- <asp:Button ID="Button1"runat="server"Text="save"onclick="Button1_Click" />
- </div>
- <asp:HiddenField ID="HiddenField1" runat="server"/>
- <asp:GridView ID="GridView1"runat="server" >
- </asp:GridView>
- </form>

Now use the following GridView event properties to perform events such as update, delete, edit cancel, and so on. Let us see what the properties are:
- DataKeyNames: This property I have used to the row index of GridView
- OnRowEditing: This property is used to handle the event when the user clicks on the edit button
- OnRowCancelingEdit: This property is used to handle the event when the user clicks on the Cancel button that exists after clicking on the edit button
- OnRowDeleting: This property is used to handle the event when the user clicks on the delete button that deletes the row of the GridView
- OnRowUpdating: This property is used to handle the event when the user clicks on the update button that updates the Grid Record
Now my grid will look such as the following:
- <asp:GridView ID="GridView1" runat="server" DataKeyNames ="id" OnRowEditing ="Edit"
- OnRowCancelingEdit ="canceledit" OnRowDeleting ="delete" OnRowUpdating = "Update">
- </asp:GridView>
On the preceding GridView properties, I have assigned the method name to be called for particular operations.

Method to Insert Data in Database
Right-click from the design page and view the code and then write the following code in the default.aspx.cs page to save the inserted records in the database:
- protected void save_Click(object sender, EventArgs e)
- {
- string strcon = ConfigurationManager.ConnectionStrings["dbconnection"].ConnectionString;
- SqlConnection con = new SqlConnection(strcon);
- con.Open();
- SqlCommand com = new SqlCommand("EmpEntry", con);//creating SqlCommand object
- com.CommandType = CommandType.StoredProcedure;//here we declaring command type as stored Procedure
- com.Parameters.AddWithValue("@Action", HiddenField1.Value).ToString();//for ing hidden value to preform insert operation
- com.Parameters.AddWithValue("@FName", TextBox1.Text.ToString());//first Name
- com.Parameters.AddWithValue("@Mname ", TextBox2.Text.ToString());//middle Name
- com.Parameters.AddWithValue("@LName ", TextBox3.Text.ToString());//Last Name
- com.ExecuteNonQuery();//executing the sqlcommand
- Label1.Visible = true;
- Label1.Text = "Records are Submitted Successfully";
- }
- public void viewdata()
- {
- string strcon = ConfigurationManager.ConnectionStrings["dbconnection"].ConnectionString;
- SqlConnection con = new SqlConnection(strcon);
- con.Open();
- SqlCommand com = new SqlCommand("EmpEntry", con);
- com.CommandType = CommandType.StoredProcedure;
- com.Parameters.AddWithValue("@Action", HiddenField1.Value).ToString();
- DataSet ds = new DataSet();
- SqlDataAdapter da = new SqlDataAdapter(com);
- da.Fill(ds);
- GridView1.DataSource = ds;
- GridView1.DataBind();
- }
- protected void edit(object sender, GridViewEditEventArgs e)
- {
- GridView1.EditIndex= e.NewEditIndex;
- gedata();
- }
- protected void canceledit(object sender, GridViewCancelEditEventArgs e)
- {
- GridView1.EditIndex = -1;
- gedata();
- }
- protected void delete(object sender, GridViewDeleteEventArgs e)
- {
- string strcon = ConfigurationManager.ConnectionStrings["dbconnection"].ConnectionString;
- SqlConnection con = new SqlConnection(strcon);
- con.Open();
- HiddenField1.Value = "Delete";
- SqlCommand com = new SqlCommand("EmpEntry", con);
- com.CommandType = CommandType.StoredProcedure;
- com.Parameters.AddWithValue("@Action", HiddenField1.Value).ToString();
- com.ExecuteNonQuery();
- con.Close();
- }
- protected void update(object sender, GridViewUpdateEventArgs e)
- {
- string strcon = ConfigurationManager.ConnectionStrings["dbconnection"].ConnectionString;
- SqlConnection con = new SqlConnection(strcon);
- con.Open();
- HiddenField1.Value = "update";
- SqlCommand com = new SqlCommand("EmpEntry", con);
- com.CommandType = CommandType.StoredProcedure;
- com.Parameters.AddWithValue("@Action", HiddenField1.Value).ToString();
- com.Parameters.AddWithValue("@FName", TextBox1.Text.ToString());//first Name
- com.Parameters.AddWithValue("@Mname ", TextBox2.Text.ToString());//middle Name
- com.Parameters.AddWithValue("@LName ", TextBox3.Text.ToString());//Last Name
- com.ExecuteNonQuery();
- con.Close();
- GridView1.EditIndex = -1;
- }
In the sample code above I have used the two string queries for giving the Stored Procedure name and the constr for storing the connection from the web.config file and another thing is that I have used a hidden field by which I am ing the action values that are required to our Stored Procedure.
Now our application is ready to use, press F5 or other as you know, then enter some values to TextBox and press the "Save" button.

Now after clicking on the "Save" button, the hidden field value takes the value "Insert" and es it to the Stored Procedure as the action and because of this, the Stored Procedure will execute a particular type of block.
Now at page load, I have called the method, so after that, the grid will fill as in:

Now click on the Edit button that calls the edit method as shown in the following grid:

If you click on the "Cancel" button then the edit cancel method will be called and edit mode will be canceled. Now enter some values into the grid TextBox and click on an update button that calls the update method and then the records in the GridView will be updated as in:
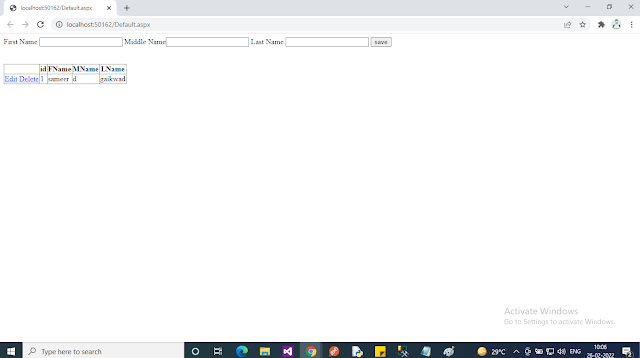
Now click on the delete button that calls the delete method and deletes the records from the GridView
- For detailed code please download the zip file attached above.
- Don't forget to update the Web.config file for your server location.


0 Comments